31 Jan 2011

Exercise: Measuring Exposure part 1

The first exercise for the Light module asks us to examine a handful of photographs that we have taken using a higher or lower light setting than the camera estimated and explain why.

1/640, f11, ISO400
Here is a shot of the Golden Gate bridge that was taken with a significant amount of sky in the image and although it wasn't a particularly bright day the camera metered for the sky leaving the rest of the image looking rather gloomy.


1/400, f9, ISO400
By adjusting the exposure by +1 stop the image is exposed to show the details of the landscape.

 1/20, f4.5, ISO400
For this shot into a shop window, the camera has tried to lift the overall light levels of the artificially lit interior which has resulted in an over exposure and at 1/20 sec enough camera shake to prevent a decent enlargement.

1/80, f4.5, ISO400
 By stopping down by -1 stop a more representative light level  and a more dramatic result was achieved.  The mannequins can be seen in better detail, the colours of the dresses are more saturated and the image is appreciably sharper. 


1/800, f14, ISO400
The pig artwork is poorly exposed as the camera has tended to meter for the pale building and sky in the background.

 1/400, f10, ISO400
 Having increased the light settings the details and impact of the subject have been recovered as the colours are much more dominant.

 1/80, f5.6, ISO400
Here the light coming through the bright coloured window has dominated the exposure and the chairs in the foreground are lost.

  1/50, f5, ISO400
By increasing the exposure compensation by +2/3 of a stop the foreground is now properly exposed whilst the background still retains its light and colourful quality.


 1/100, f7, ISO400
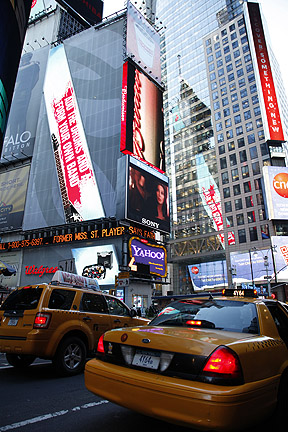
In this image of Time Square, the brightness of the sky reflecting from the buildings has made the foreground rather gloomy.


 1/80, f5.6, ISO400
 In order to recover the colours and detail in the foreground the shot was taken again with +2/3 stop which has lifted the image nicely and balanced the light from street level and from the higher parts of the image.

Although modern cameras have very sophisticated metering capabilities, they have no real idea what it is that you are photographing and can only attempt to balance the levels of light and dark to achieve an average result.   When the camera is fooled it is up to the photographer to compensate to achieve the desired result.  Nowadays we have the enormous advantage of being able to review a photograph and its histogram immediately to ensure correct exposure.  With wet film the only option was to bracket the expected exposure settings to ensure that good result.  That bracketing option is still available on good digital cameras and is a smart thing to use for those important photographs when lighting is difficult and the option to examine and retake the shot is not there.
  

28 Jan 2011

Assignment 3 - Tutor Feedback

My Tutor has been busy so it has taken a little longer than usual for him to get back to me.  The wait was worthwhile as he was most complementary about the majority of my work which is available here.

Without going into too much detail he was pleased that I had managed to produce a number of striking images.  The ones he highlighted as being my weakest were:

Yelow Peril, where he felt that the photograph didn't explain itself well enough.  He thought that I might have tried to take more control of the shot to get a better image.  The trouble with street photography is that the only control that is usually available is a quick movement to change angle a trifle, a zoom to frame the shot, a setting adjustment and the moment when to press the shutter release.  I don't often try to pose my street subjects unless they initiate a dialogue and make it obvious that they are amenable to being positioned.  For me the expression of the spiky haired girl was a moment captured and probably not repeatable.

Bad Hair Day, could have been better framed around the second girl with the blue hair.  In this, my tutor has hit the nail on the head as I have re-looked at the photograph and realised that the gap between the two girls was too big and/or I should have given her a bit more room to the right of the image.

Floating High, suffered from slightly bland colours and the composition wasn't as strong as the others.  I also felt that this was my weakest image also because of the lack of colour both in strength and area.

Where's my Super Mum, was a good image but we both felt that it suffered from having a subject that was a little too large for the frame to be a strong colour accent.  I had my 100-400 mm lens on and was working the crowd from above so was zooming in tight onto my subjects.  When I took the shot I didn't really have a colour aspect image in mind which is a shame as I could have easily backed off a little to get the desired effect.

The shots that were singled out for praise were:

Travelling in Style, which was considered a striking image but it was suggested that I might have cropped out the top of the bus to create a more surreal image,  I don't actually agree with this as I think it would have just looked like a taxi going past an advertising board and the inclusion of the people at the top of the image gave an extra dimension.

Petal Pushers, an orgy of colour.

The 3rd Encounter, where the colours worked particularly well against the jet-black background.

Orange Box, where the composition was complemented.

Gardening Shoes, was considered vivid and an excellent observation.

You Looking at Me, was thought to be a great image with 3 simple elements coming together well.

The Colour of Coffee, showed elegance, good geometry with great balance.

Life Preserver, was thought to be the best of the bunch providing an incongruous juxtaposition.

I'm chuffed that this assignment was so well received particularly as I found it so hard to discover the colours that were needed in real life situations.  I probably worked through three months of work to get the images I chose and was pleased that my efforts weren't wasted.

Other areas of comment included my blog which showed plenty of good work, particularly as I had managed to get to the Henri C-B and Capa exhibitions.  

Finally it was suggested that I should keep my assignment captions simple, just place and subject rather than trying to enforce the narrative.  I guess they would also appear more professional that way... point taken.

24 Jan 2011

Into the Light

My Tutor advises me that it will take him a while to get to my Assignment so in the mean time I am starting to read Part 4 - Light.  In preparation I am studying from a few of my favourite photo books looking for information and background on this huge subject. I don't expect to get much from Tom Ang's Digital Photographer's Handbook as he only touches on each subject in a wide field covered by the book.  John Hedgecoe covers a bit more in his very detailed book The Photographer's Handbook and I do like the amount that John covers, leaving very few stones unturned.  However, I expect to get the most inspiration from Light, Science and Magic by Fil Hunter, Steven Bever and Paul Fuqua.


Of course our OCA study notes will by the backbone of my study materiel as it leads me into the first Exercise, Measuring Exposure.  To make sure that I fully understand how my camera measures light I have been studying my manual again.  My Canon EOS 5D and 5D II have the same metering systems which allow four types of light measuring.


The most sophisticated is the Evaluative metering mode which is an all round metering mode suitable for portraits and even back lit subjects.  This is a type of matrix metering which weighs the intensity of the light from all round the subject and using complicated algorithms, comes up with a light setting that limits the amount of blown and dark areas whilst concentrating on the subject which is assumed to be under the focus point used.  In almost all but the most difficult lighting conditions, this setting works very well.


The camera has 3 other types of metering.  Partial metering which covers about 8% around the centre of the viewfinder area; Spot metering which covers only 3.5% of the viewfinder area and Centre-weighted average metering which is weighted at the centre of the viewfinder but averaged for the entire scene.


Other metering controls allow a quick selection of exposure compensation by stopping up or down from the metered value by up to 2 stops.  In addition an automatic Exposure Bracketing setting is available for up to 2 stops either side of the metered value.  Finally, an exposure lock feature allows the metered value to be frozen and used when a subject is re-framed to a brighter or darker value.


Once a photograph has been taken, the monitor can produce a histogram of the light distribution in the image and illustrate blown highlights on the image thumbnail by marking the areas with a flashing outline. The camera uses between 10% & 18% of reflected light as its base exposure level.  Any object that reflects more than this will fool the camera into underexposure and visa versa.  This is why the photograph of a piece of white paper will often look grey.

18 Jan 2011

Assignment 3 - Colour

I have published my TAOP Assignment 3 - Colour on my assignment web site and it is available for viewing here.  I have enjoyed getting back to serious work and although this module had offered its fair share of frustrations I did enjoy shooting the assignment and going through my selections for assessment.

Any comments would be much appreciated.

17 Jan 2011

Christmas presents

Father Christmas was good to me this year!  I have been hankering after some compact studio gear to enable me to quickly set up a portrait session and get quality, repeatable results every time.  I saw the work that a college did on photographing the kids at his school and was very impressed so begged Santa for the Lastolite Hi key background and some more studio lights to use with it.


I am delighted with the background and have been playing with it making my long suffering family pose.  It unpacks quickly, is self standing and takes one or two flash lamps in the sides to illuminate the interior.  Once this is done, any normal studio set-up can be done around the model without the need for any back lighting as that will come from the background.  The balance of light is to get the exposure coming from the background 1-2 stops higher than the light you are putting onto the subjects.  Once this is done a completely shadow free shot can be taken regardless of how close to the background your model stands!  This has great advantages when working in limited space since the whole thing is only 6"x7" and a couple of feet deep.

I have still to experiment and perfect my set up but here are a few shots from my first attempt with it.


I am getting some falloff in these shots as I tried putting only one lamp into the background and the illumination isn't quite even enough but with one each side that problem should go.  All in all I am very pleased with the results.  The only real problem is working out how to twist the background back into a circle to get it back into the carrying case!