19 Dec 2009

Photographing Movement: Conclusion

This part of the course consisted of a number of exercises centred around the basic functions of the camera to remind us of how aperture and shutter speed affects the photograph.  In conclusion the course notes ask us to display a couple of photographs from each of the two series which we like.  The photos that I have chosen were both taken with the formal exercises in mind but haven't been published by me yet.

Firstly I have chosen a shot of a moving van from the panning exercise.  The image shows a grafiti covered van driving at speed under overhead wires and past a house.  The graffiti suggests that the van comes from a troubled neighbourhood as it has been tagged, possibly by a gang who mark their territory in that way.  Taking the van into the wrong area with such a tag might be dangerous.  Best viewed enlarged, the effect of panning has rendered the two people in the cab sharp bringing them to the attention of the viewer.  They could be Chinese immigrant workers and they look intense with concentration or concern, both staring straight ahead.  It gives the image a slightly unnerving quality, particularly as the exaggerated feeling of speed gives the impression that they are driving too fast for comfort.


Truck - 1/30, f18, 45mm, ISO50

My second photograph comes from a recent set that I took whilst exploring the advantages of shutter speed to enhance and add realism to my photography.  It was taken from back stage at the Death Metal gig of a band called Bloodshot Dawn.  Metal music involves a 'uniform' of long hair, black clothes and exaggerated movements such as the wind-milling of hair whilst head banging.  A great way to emphasise this in a still photograph was to use a slow shutter speed to create blurring.  I was also shooting through the drummers equipment to give an impression of the chaos and rawness of the music and I particularly like the decapitation of the performer of Death music by the cymbal\symbol.  I chose a short depth of field to put this equipment out of focus and bring the lead singer into centre stage where he belonged.  So in this one photograph I was able to combine several techniques from the previous exercises to achieve the shot that I wanted.  It shows the guitar player in the middle of a complicated riff, concentrating on his fingering whilst still whirring his hair round and round in the classic death metal style.


Metal -  1/30, f1.8, 50mm, ISO640
 

18 Dec 2009

Project: Photographing movement.

Exercise: Panning with different shutter speeds.

The final section of the Introduction to The Art of Photography involves another exercise in photographing movement.  In this exercise the object is to pan the camera to follow a moving subject in order to keep the subject sharp and allow the background to show motion blur instead.  This is the opposite of the previous exercise when I photographed moving people with a stationary camera.  The technique is essential when trying to achieve sharp photographs of very fast moving subjects like a racing car or an aircraft at a display because even with a very high shutter speed the subject will blur slightly.  Certainly, if the available light is low then even a slow moving subject may well need a panning technique because a high shutter speed may not be an option.  The technique also has the advantage of achieving a blurred background which gives the feeling of speed to what otherwise may appear to be a very static photograph.

On a technical note, I set the auto-stabilisation on this lens (23-105 1:4 L USM IS) to off as it won't function when the camera is being panned.  My Canon 100-400 1:5.6 L USM IS has two auto-stabilisation settings, one of which can be good for panning as it corrects for movement in the vertical plane but not in the horizontal plane and most panning is done in horizontally.  I also pre set the lens focus point as it is hard to achieve an accurate focus in time to capture a fast moving subject.

The first subject that I chose was a moving train but there weren't enough of them to allow me to complete the task without turning into a block of ice, the temperature being below zero!  I did, however, take a couple to show the difference between a panning shot and a stationary shot at 1/60th sec.


1/60, f14, 28mm, ISO50, Camera still


1/60, f10, 28mm, ISO50, Camera panned
 The observation from these shots is that the level of motion blur is very similar for the moving train and the background, depending on if the camera is panned or not.

So to preserve my fingers from frost bite I raided Starbucks for hot coffee and then started shooting the cars moving over the level crossing.


1/30, f22, 58mm, ISO50
At 1/30th a well panned shot can freeze sufficient of the subject to achieve a good level of sharpness.  Bear in mind, however, that 1/30 is probably the slowest speed that most photographers would attempt any hand held shot if they wanted a sharp result. The sharpness of the drivers hand in the blow up below shows that even at 1/30th it is possible to get a good result. Of note, I was panning with respect to the centre of the car, which is the area that shows no motion blur.  The front and rear of the car are still subject to motion blur as they are moving at different relative speeds when compared to the middle of the car. 


Section from photograph above
At 1/30th sec the background shows a high level of motion blur which isolates the car from it to such a degree that it isn't even obvious that the car is on a level crossing.  This can be an advantage but it also means that the subject is now out of context and must stand on its own merit.


1/60, f16, 58mm, ISO50
At 1/60th sec the cars are becoming clear and sharp whilst the background still retains a nicely blurred effect.  In my mind this was a good choice of speed for this particular subject, balancing the sharp look of the car against the blurred but recognisable background.  Of course a faster car would have needed a faster pan and therefore a faster shutter speed to achieve a good result...  nothing is cut and dried!


1/125,  f10, 58mm, ISO50
At 1/125th the car is very sharp and well defined and the background is showing much less motion blur.  Indeed, the blow-up below shows the car Mustang insignia in the centre of the turning wheel quite clearly.  Of course this has the effect of 'reducing' the speed of the car which now appears to be going much slower than the white 4x4 in the first shot above.  So the shutter speed becomes a trade off between seeing the detail on the subject and achieving a good blurred background.


Section from photograph above


Panning is an essential technique when dealing with moving subjects, particularly when the available light is limited.  It is often the only way of making the subject recognisable from a mess of blur that would otherwise have occurred.  In the same way demonstrated by the exercise in depth of field, panning can emphasise the subject and bring it out from the rest of the photograph in a way that other techniques can't.  Panning also has the effect of demonstrating the speed of the subject, bringing an illusion of motion to the fixed medium of a photograph.  As such it is an excellent tool to keep in a photographer's bag of tricks and doesn't only need to make an appearance at the F1 racing circuit.


7 Dec 2009

Project: Photographing movement.

Exercise: Shutter speeds.

There are three main variables that affect the exposure of a photograph, aperture, shutter speed and film/sensor ISO rating.  We have looked at the effect of aperture on a scene and how it alters the depth of field but when changing the aperture either the shutter speed or the ISO rating is going to have to change as well in order to keep the exposure correct.  With changing aperture the most common variable to alter is the shutter speed, particularly when shooting a static scene from a tripod as was done in the Focus Exercise.

This exercise looks at how changing shutter speeds affect moving subjects.  I chose a frequently used beach path at the edge of South Beach in Miami, FL, USA.  The camera was set onto a tripod and I took photographs of people as they passed the lens.  I chose a moderate wide angle of 30mm to get good coverage of the area and good depth of field.


1/8, f22, ISO50, 30mm.

At a slow walking speed, photographed with a shutter speed of 1/8th sec, almost any movement of the people results in motion blur.  What this means is that while the shutter was open, part of the image presented to the sensor was moving sufficient for it to be registered in several different positions during the exposure.  Obviously, the faster the moving object, the more motion blur is observed e.g. the peoples legs.  The background behind the moving legs is only obscured for a small part of the exposure so there is sufficient time for it to register on the sensor once the leg is out of the way.  This leads to the ghosting (semi transparency) of that part of the image.  An object that moves fast enough through a frame shot at a slow speed may not register at all.  The only part of our walking people that isn't blurred are the feet that are in contact with the ground during the exposure.  Relative to a stationary camera, a foot that is on the ground moves at the same speed as the ground i.e. not at all, and therefore shows no motion blur.  Without the aid of a Neutral Density filter, using the slowest ISO setting of 50 and the smallest aperture of f22, 1/8th sec was the slowest speed that the available light would allow.


1/10, f22, ISO50, 30mm.

There is very little change between 1/8th and 1/10th (one third of a stop) but despite being slightly faster the person here is considerably more blurred.  I would hope that the reason is fairly obvious, they are moving faster.  However, the subjects speed isn't the thing that creates blur, it is their movement relative to the camera.  An airliner flying past a long way away may well be flying at 400 mph but because of it's distance from the camera it only crawls past and may not blur, whereas a person running at only 5 mph but close to the camera is gone in a second and will be completely blurred.  The runner here is going fast enough for even their grounded foot to move during the shot.


1/15, f18, 30mm, ISO50.

At a 15th of a second we are approaching speeds that can be carefully hand-held if a little camera shake isn't a worry (however in this sequence a tripod is used throughout).  Walking people are recognisable as such, whereas the running lady remains a one legged blur.


Both at 1/30, f11, 30mm, ISO50.

At 1/30th very small amounts of movement are sharp so the man and dog in the appear unblurred.  In the other photo it can be seen that, although they are not completely sharp, the walking couple are becoming acceptably clear.  The running man, however, remians well blurred.  A 1/30th is usually the slowest speed it is acceptable to attempt a hand held photograph.


1/60, f10, 30mm, ISO50.

  At 1/60th the images are a combination of sharp on those parts of the body that are moving relatively slowly and a little blur on swinging arms and feet.  This is a good shutter speed to show a little motion blur to emphasise the movement of a subject.

 
1/60, f10, 30mm, ISO50.

Whilst slowly moving objects may be starting to become sharp at 1/60th, a faster object like this cyclist is still moving too quickly to become frozen.  However, the couple walking down the path towards the camera are nice and sharp as can be seen in the blow-up below.  This is due to their slow speed and because they are moving towards the camera giving very little relative motion.


Enlargement from photograph above.


1/125, f7.1, 30mm, ISO50.

In this composite shot taken at 1/125th even the fairly fast moving cyclist is becoming less blurred.  The spokes in the wheels are starting to be visible but much of the rest of the subject still shows motion blur.  Of interest, the pedals show no more blur than the rest of the body as the bike is moving just as fast as the pedals are going around.


 1/200, f5.0, 30mm, ISO50.

Enlargement from photograph above.
At 1/200th the cyclist is almost sharp everywhere and now the amount of enlargement starts to become a factor in determining the level of blur.  A small picture might well appear sharp but on enlargement areas of motion blur may become obvious as can be seen in this section of the original photograph.


1/200, f5.0, 30mm, ISO50.

Shot at the same speed as the previous example, it is worth noticing that a walking person is now nicely sharp with only tiny areas of motion blur obvious, such as on the left foot, whereas the right foot is pin sharp.
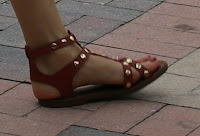
 
The left foot               


The right foot


1/400, f8, 30mm, ISO200


An enlargement from the above photograph.
As I bring the speed up to 1/400th we can see very little evidence of motion blur at all.  An enlargement, however, reveals that even at this speed a small amount of blurring still occurs when compared with the static background.  An astute observer will have noticed that as the shutter speed has increased during this series of photos, the aperture has increased in size to compensate for the reduction of exposure time.  On this photograph the aperture limit was reached and the only recourse was to increase the ISO rating from 50 to 200 to regain the status quo.


1/2500, f4, 30mm, ISO200.

An enlargement from the above photograph

 For this final photograph I cranked the speed up to a generous 1/2500th and truly froze the action.  Bear in mind that the subject isn't moving particularly fast when compared with photographing something like motor sport.  For faster subjects a panning technique is almost essential and I will explore this in my next Exercise.

2 Dec 2009

Depth of field in practice.

I thought I would add a little to the formal exercise on depth of field by showing a couple of examples from my past photographs where I demonstrate the use of depth of field in practice.  These shots were taken whilst walking the streets of Chicago.  The first is a candid shot of a girl in a crowd of pedestrians walking up the magnificent mile.  I took a number of these type of shots and, wanting to ensure that the subject was always the point of interest for the photograph, I kept the aperture as wide as the lens would allow.  Of course most long telephotos don't open up much more than f4 and with the 310mm focal length that I used on this photo the maximum I could obtain was f5.6.  However, since a long lens limits the depth of field anyway1 f5.6 was sufficient for my task.  Even had I wanted to have a larger aperture I wouldn't have set it as I wanted to make sure that all of the subject was in focus and it wasn't easy shooting and keeping the focus moving perfectly as people walked towards me.  However, I achieved my desired shot with the focus and depth of field correctly set.


Girl in a crowd, 1/250, f5.6, 310mm, ISO400.

As the next photo needed a wide depth of field to cover foreground to infinity I chose a wide angle lens and an aperture which was a reasonable compromise from the available light and the necessary aperture setting.  An aperture of f11 with a focal length of 17mm gave me all that I needed to keep the entire picture sharp.

Chicago in water, 1/125, f11, 17mm, ISO400. 

1. The depth of field change that occurs when moving from a wide angle to a long telephoto lens is due to the reduction of viewing angle that a long lens produces.  If the same subject is photographed with differing lenses and is kept the same size by moving closer as the focal length reduces, then the depth of field remains constant.  This concept is now fairly well accepted, certainly by me.


29 Nov 2009

Thinking about Contrasts assignment

Spent a good while on the phone yesterday chatting to my tutor Jesse.  He has got me thinking about how to approach the first assignment.  He suggested that I should try to make each pair of photographs more than their combination... as he said, try to make 1+1 equal 3. So, no individual and simplistic interpretations of the word clues, but an attempt to indicate a situation or thought with two contrasting images.  Hmmmm....

I sat doodling in my field book last night and tried to come up with some ideas.

Two people, one quite large and one Petit.  Eyes directed in appropriate directions as if they were looking at each other's face.  Not a cut down the same photograph but perhaps separated by a door with the guy outside clutching some flowers and the girl dressed for a night out.  Or perhaps in different rooms by telephones waiting for them to ring.  Light/dark gives me the idea to shoot the same striking object, an ornament or suchlike with two lighting conditions, one front lit against a dark background and the same shot back lit against a white background.


Hard/Soft gave me the idea of a round, soft backside with a red line across a cheek contrasted with a portrait shot of a male hand holding a thin cane or riding crop.  The obvious link being sexual dominance in an SM situation.  Need to find a willing backside which won't be easy!  Strong/weak gives me a chance to put another slant on relationships between the sexes with pictures of two hands.  A slender, weak female hand held up defensively and a strong male fist about to strike.  In addition, this contrasts between the previous shots as well, going from sexual dominance to domestic violence.  Solid/liquid automatically makes me think (as I am sure lots of other people have thought) of ice and water.  Perhaps continuing a theme of relationships through the assignment I might try to show a failed marriage proposal.  An engagement ring frozen into an ice cube in a drink being a suitors attempt to propose, with the same ring in a puddle of water after a refusal.


Straying from that theme of relationships, Narrow/Broad might be shown as a narrow stream and a broad river, the link being a small toy boat floating down one and into the other.  I remember this from the title shots in a strange Austrian kids programme that I watched when growing up!

My biggest hurdle is not going to be ideas but having the facilities to shoot them as I need both models and a studio!  I might have to keep thinking! 


28 Nov 2009

Project Focus

This part of the Introduction deals with depth of field.

The depth of field is the area in a photograph that is acceptably sharp.  This can be a small or large area depending on the aperture chosen.  There is only one distance in a scene that the camera lens can perfectly focus on.  All other points display a circle of confusion at the point the light falls onto the film or sensor.  Small circles of confusion can be acceptably sharp depending on the amount of photographic enlargement.  Large circles of confusion appear out of focus.  As the camera aperture is reduced in size the path of the light narrows as does the size of the circles of confusion, hence with a small aperture more of the photograph is in focus.

The exercises demonstrate the relationship between the size of the aperture and the depth of field.  Firstly by photographing with a set, wide open aperture and differing focus points.


 Close focus point, f1.4, 1/2500, 50mm.


Middle focus point, f1.4, 1/2000, 50mm.


Distant focus point, f1.4, 1/2000, 50mm.

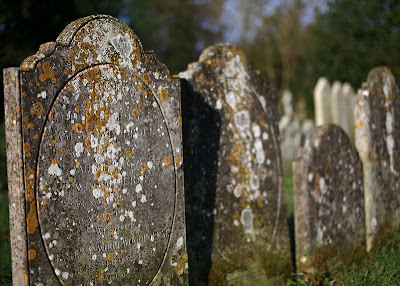
These first 3 photographs, taken with the same wide aperture of f1.4 all display a narrow depth of field.  The most narrow is the first where the focus point is the centre of the closest grave stone.  Here the depth of field is only a few inches.  In the second photograph the focus point is a more distant stone which throws the close foreground and the background out of focus, whereas the final shot has all of the foreground out of focus with the middle area sharp.  In the second two photographs the depth of field has expanded from a few inches to several feet as the focus of the lens approaches infinity.

This second exercise has a set of photographs taken with the same focus point and differing apertures. 
 
Set focus point, f1.4,  1/2500, 50mm.


Set focus point, f 8.0, 1/100, 50mm.


Set focus point, f 16, 1/25, 50mm

This second set of 3 photographs has the same focus point, the edge of the small grave stone in the foreground.  The shots are taken with a reducing aperture ranging from f1.4 to f16.  In each shot it is evident that the depth of field is growing to encompass more of the scene until the final photograph has everything in the photograph at an acceptable level of sharpness.


The scene chosen has objects near and far to demonstrate clearly the areas of sharpness.  A narrow depth of field has the advantage of isolating an area from its surrounds, bringing the subject of the photograph out of the clutter.  It can also add depth to the photograph that is missing when everything is sharp and has equal dominance.  For this reason my preference for a particular shot is the very first of the two sequences (Close focus point, f1.4, 1/2500, 50mm.) which has the closest grave stone in focus and the rest of the shot blurred.  This shot gives the large headstone prominence allowing me to admire the pattens and colours of the lichen and the stone mason's art.  The rest of the graveyard is still there and the lines of stones lead the eye to the main subject but the observer isn't confused as to the point of interest as everything else is blurred.  Without the narrow depth of field several similar stones would fight for dominance leaving one in doubt as to where I wanted you to look.   Had I been taking this shot without the need to demonstrate the point of the exercise I might have closed the aperture one stop to bring the whole of the left stone into focus.  I would have also stepped back a couple of feet to avoid cropping the oval cut into that first stone.    

Notes:  The location is a disused church and church yard in West Liss, Hants.  It was shot at 11am when the sun would be to the SSE striking the grave stones, which are orientated E-W, at an oblique angle to cast shadows across the faces bringing out the carving and imperfections of the stone.  The bright light cast nice hard shadows and made it easy to see the differences between being in and out of focus.


26 Nov 2009

Photography 1. The Art of Photography. Introduction.

I like the tone of the writing and it all makes good sense.  I think I know my camera well and can find my way around it without any problems but can see the sense of making sure.

Exercise: Focal length and angle of view.
I have always assumed that 50mm was the standard real life size for a 35mm format but tried this exercise anyway.  I was a little surprised to see that in my viewfinder real life size is more like 70mm.  Of course the viewfinder may not be translating the image 1:1 and as I need varifocal glasses to correct for both long and short vision defects... one of the curses of age, my eye may not be seeing 1:1.  A quick look at the Spec page of the manual shows that the viewfinder has a magnification of 0.71x(-1 dioptre with 50mm lens at infinity).  I don't understand all that but I do realise that an image size multiplied by 0.71 will appear smaller to the eye which probably explains why I need  70mm of telephoto to bring the image size up to real life.  I'm not sure that this is a particularly valid exercise anyway as it is the image that the sensor sees that is relevant, not what the viewfinder produces as many cameras, mine included, will alter the image slightly.


I don't think I will actually print off 3 A4 shots of my living room just to see where I have to hold the paper to simulate the size of the real thing.  I feel that it goes without saying that the wide angle shot will show things smaller than life (an effect that has killed at least one person... ask if you want to know more) so I will have to hold a print closer to my eye than a 50mm or telephoto image.

Just testing

Ok... it is time to play a little to see how I can configure this to suit my needsI'm going to try embedding and then uploading a couple of pictures to see how they look.


Not sure how flexible this is in positioning but easy enough to get in from Flickr, now to try downloading one directly.


That seemed to happen Ok!  I guess I can make this work so on to something more real.

Study material here!

That was quite quick.  A box of tricks through the post and a heap of questions to be answered.  I have introduced myself to my tutor and scanned the information but already I am a bit unsure of how to proceed.  Should I try to make this my logbook or start a paper one?  Can I put the scraps of interesting visual stuff into a blog in the same way I would in a real work book?  I guess I shall have to experiment.  I was hoping to keep away from printing and posting physical photos but it seems my tutor wants paper assignments... I hope not.

21 Nov 2009

Starting the course

Just enrolled. With all that is going on, will I have time to give this course enough attention?  Time will tell.  I am not too worried about the quality of my photography but more the esoteric nonsense that is banded about when discussing someone's work.  Will I loose interest because I find it hard to see some missing element of emotion that a photograph is claimed to possess?  I'm not confident.