The depth of field is the area in a photograph that is acceptably sharp. This can be a small or large area depending on the aperture chosen. There is only one distance in a scene that the camera lens can perfectly focus on. All other points display a circle of confusion at the point the light falls onto the film or sensor. Small circles of confusion can be acceptably sharp depending on the amount of photographic enlargement. Large circles of confusion appear out of focus. As the camera aperture is reduced in size the path of the light narrows as does the size of the circles of confusion, hence with a small aperture more of the photograph is in focus.
The exercises demonstrate the relationship between the size of the aperture and the depth of field. Firstly by photographing with a set, wide open aperture and differing focus points.
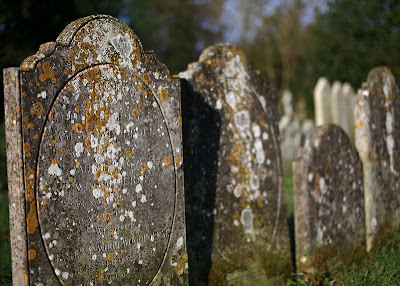
Close focus point, f1.4, 1/2500, 50mm.
Middle focus point, f1.4, 1/2000, 50mm.

Distant focus point, f1.4, 1/2000, 50mm.
These first 3 photographs, taken with the same wide aperture of f1.4 all display a narrow depth of field. The most narrow is the first where the focus point is the centre of the closest grave stone. Here the depth of field is only a few inches. In the second photograph the focus point is a more distant stone which throws the close foreground and the background out of focus, whereas the final shot has all of the foreground out of focus with the middle area sharp. In the second two photographs the depth of field has expanded from a few inches to several feet as the focus of the lens approaches infinity.
This second exercise has a set of photographs taken with the same focus point and differing apertures.
Set focus point, f1.4, 1/2500, 50mm.

Set focus point, f 8.0, 1/100, 50mm.

Set focus point, f 16, 1/25, 50mm
This second set of 3 photographs has the same focus point, the edge of the small grave stone in the foreground. The shots are taken with a reducing aperture ranging from f1.4 to f16. In each shot it is evident that the depth of field is growing to encompass more of the scene until the final photograph has everything in the photograph at an acceptable level of sharpness.
The scene chosen has objects near and far to demonstrate clearly the areas of sharpness. A narrow depth of field has the advantage of isolating an area from its surrounds, bringing the subject of the photograph out of the clutter. It can also add depth to the photograph that is missing when everything is sharp and has equal dominance. For this reason my preference for a particular shot is the very first of the two sequences (Close focus point, f1.4, 1/2500, 50mm.) which has the closest grave stone in focus and the rest of the shot blurred. This shot gives the large headstone prominence allowing me to admire the pattens and colours of the lichen and the stone mason's art. The rest of the graveyard is still there and the lines of stones lead the eye to the main subject but the observer isn't confused as to the point of interest as everything else is blurred. Without the narrow depth of field several similar stones would fight for dominance leaving one in doubt as to where I wanted you to look. Had I been taking this shot without the need to demonstrate the point of the exercise I might have closed the aperture one stop to bring the whole of the left stone into focus. I would have also stepped back a couple of feet to avoid cropping the oval cut into that first stone.
Notes: The location is a disused church and church yard in West Liss, Hants. It was shot at 11am when the sun would be to the SSE striking the grave stones, which are orientated E-W, at an oblique angle to cast shadows across the faces bringing out the carving and imperfections of the stone. The bright light cast nice hard shadows and made it easy to see the differences between being in and out of focus.


No comments:
Post a Comment