13 Mar 2011

The earthquake in Japan

The day after I took the images in my previous 'Light Through The Day' posting I departed from New Tokyo airport back to London little realising that a couple of hours after our departure the country would be hit by a vastly damaging earthquake and subsequent tsunami.  Information was difficult to obtain and our Operations department had only sketchy details but by the time we landed at least we knew that our work colleagues who bought our aircraft in and were resting in the hotel were all safe and well.

The same of course can not be said for vast swathes of the country to the North East of Tokyo which were devastated by the huge volumes of water that gushed inland.  Tokyo has been a frequent destination of mine for many years and I have made friends and enjoyed the perfect hospitality of the Japanese people.  My heart breaks for them as they endure this awful disaster.

Exercise: Light through the Day

I took advantage of a recent clear day to shoot this exercise, which is why it appears slightly out of order.  This exercise hasn't, I expect, been very popular amongst students as it involves taking an entire day to carefully shoot the identical photograph of a scene for all the hours of daylight at least every hour and on a day of direct sunlight.  Such days are not particularly common in winter but I was lucky enough to encounter a good forecast for a day I had free in Narita, near Tokyo.  The scene was to be a landscape with a fairly definite subject that would catch the sunlight even when close to the horizon and that would receive the sunlight throughout the day.  Sun rise at this location would be 6:03am and sun set 5:57pm.

I am not a devoted landscape photographer, unlike Glyn Davies whose work I greatly admire (I am a frequent visitor to his blog), so I am not used to getting up to be in place for first light.  It was quite a shock to find myself setting up my tripod at 5:30am rushing to get my camera set up before I lost the pre-dawn light.  Once the initial shots were taken I found the labours of either waiting in near zero temperatures with a biting wind for an hour to pass or trotting the mile into town for a quick warming coffee before rushing back to be in place for the next shot something of a trial.

The results are below and although there are undoubtedly many better landscape views available around the world, this one seemed to fit the bill and I was pleased with my results.  The scene is part of the Narita-san Shinsho-ji Temple and although the views that met the brief were few I managed to get one that looked Nth Est (about 065 deg).  This meant the sun would rise on my right, travel behind me during the day and set to my left.  Being winter and therefore a low sun, that would ensure that I could view the effects of the light without having to worry about shooting into sun.


1/4sec f11 ISO400
5:40am
1/60 f11 ISO400
6:10am

1/250 f11 ISO800
6:30am


1/250 f11 ISO800
7:00am


1/200 f11 ISO200
8:00am


1/400 f11 ISO200
9:00am


1/500 f11 ISO200
10:00am

1/500 f11 ISO200
11:00am


1/800 f11 ISO200
12:00 noon


1/800 f11 ISO200
1:00pm

1/500 f11 ISO200
2:00pm


1/500 f11 ISO200
3:00pm


1/400 f14 ISO400
4:00pm


1/60 f11 ISO200
4:40pm


1/80 f8 ISO400
5:20pm

3sec f14 ISO800
5:50pm


20sec f11 ISO200
6:10pm

So, which of these images do I prefer?  I arrived to recce the scene the previous day at about 3pm and at that time I thought the foreground stone wall and signpost would serve well, the middle ground of the smaller temple buildings would give some interesting shadows and trees with the tall pagoda in the background would catch the very last of the light.  The disadvantage of having to keep the same shooting angle throughout the entire day meant that at times the view was quite plain.  Even when the light was at its best it was very frustrating not to be able to swing around and adjust the focal length to get the best from the view.  As it turned out, local effects put my foreground mainly into shadow during the golden hours but the signpost caught a lovely evening shaft of sunlight in the 4:40pm image.  I expected dawn to be the best period as I was looking to the Nth Est and was going to catch the sunrise on the right edge.  Unfortunately, needing a cloud free day meant that many of the eye catching effects that a low sun has when reflecting off cloud weren't available so it wasn't as good as I hoped.  Again, I was hoping that the sunset would provide beautiful illumination of the trees and the pagoda, which it did, but I needed to tighten up my shot to take advantage of it.  Surprisingly, my best shot came in the minutes after sunset as the last of the light picked out the cloud to the North whilst the street lights picked out the details of the trees and buildings below.

7 Mar 2011

Exercise: Judging Colour Temperature

PART 1

I find it most strange that we should describe colour temperature by the shades of hot iron and then measure it in degrees Kelvin!  This gives us a level of temperature that is quite inappropriately high for something as delicate as photography and in a scale that is usually the province of physicists.  However, the foibles of photographic history aside it might just as well be Kelvin as Bananas as there are plenty of other strange scales which we use and it is just a measure after all.

With the camera White Balance set to Daylight this exercise asked us to take images in midday sunshine, midday shade and with a low sun... in my case sunset.  The results are below:

  Noon Sunlight

Noon Shade

Low Sunlight

The results are very much as expected.  The direct sunlight shot shows completely neutral colours in that my grey mottled mannequin head looks exactly as it does to the eye.  The other noon shot displays what was difficult for me to note with by eye in that is has a distinct blue cast.  The evening shot was more noticeable because as I set it up I could already see that the low sun was tending towards orange and that colouration would naturally transfer to the photograph.  Indeed, it has a distinct orange/red tint.


PART 2

Looking at the previous exercise I definitely prefer the colour obtained in Noon Sunlight as I rarely think a colour cast improves an image unless it can, for example, compliment colour or add to atmosphere.  Certainly the blue cast of Noon Shade is not an unpleasant colour and the orange of Low Sunlight also acceptable but neither of them looks at all natural and don't suit the subject.

The second practical part of this exercise asked us to repeat the set up but this time shooting three versions of a subject in White Balance settings Daylight, Shade and Auto.

Sun with WB Daylight

Sun with WB Shade
 
 
Sun with WB Auto

The settings for these 3 images has the Daylight and Auto photos looking fairly similar, auto being slightly bleached out but shooting with Shade set has given a distinct orange cast.

Shadow with WB Sunlight

Shadow with WB Shade

Shadow with WB Auto

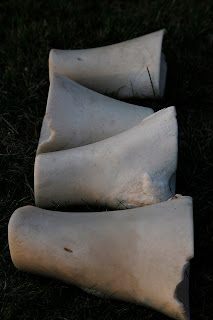
Here taking the same 3 photos in shadow shows that the pre-sets for light conditions are probably the most accurate rendition of the subject.  Compare Shadow with WB Shade to Sun with WB Daylight and they are remarkably similar.  My only other comment is that the actual bones are quite a plain creamy hue with very little yellow/brown colouring so the most accurate image so far (with respect to colour) is Shadow with WB Auto.

Sunset with WB Daylight

Sunset with WB Shade

Sunset with WB Auto

Finally, shooting at sunset one would expect the photos to have the usual orange tint that a setting sun delivers which is what we get with the WB settings at Daylight and more so with Shade but what I didn't expect was the more accurate colour that Auto gave.  This is an interesting result as Auto seems to have corrected well for all light conditions.  So despite making the effort to manually set the White Balance of my camera I have achieved a more accurate representation with the 'coverall' automatic settings.

2 Mar 2011

Exercise: Higher and Lower Sensitivity

In the old days my camera bag was cluttered with various rolls of film from luscious colour slide, through bog standard ASA200 colour print to highly sensitive and big grain Black and White.  Many rolls were half used and rewound waiting for an opportunity to finish them off.

Of course nowadays my camera can replicate many of the results I obtained with my 'wet' medium at the flick of a dial.  Using a good digital has, however, made me a bit lazy and it was good to go through this exercise to remind me of the flexibility available.

Most of the time I shoot with as low an ISO setting as I can get away with so that my photos have as little noise as possible and can be easily blown up to full size without deteriorating.  When I am faced with a low light situation I usually try to get away with using my image stabiliser or a tripod if I am lucky enough to have brought one.  Some situations, however, need good control of depth of field or speed and I need to wind up the ISO sensitivity to get the speed and aperture settings that I need.

1/30  f5.6 ISO 1600

For example, this shot of the Guggenheim Museum in New York needed to be hand held so I selected the lowest speed I could get away with, an f stop that would just about give me enough depth of field and an ISO that exposed correctly.  All were a compromise as I would have loved to have shot at 1/200, f11 and ISO 100 but without a tripod and shooting quickly as compositions presented themselves that was not an option!


1/350  f11 ISO800
 Here I was shooting in the early morning light, working fast to get what I wanted before the sun rose too high so I preset ISO800 and worked without worrying too much as I knew that I would have enough sensitivity to cope with a reasonable shutter speed and f stop.  As can be seen I could easily have lowered the ISO as I had plenty of light at this point.

Closeup
At ISO800, as the closeup shows, noise wasn't a problem as my camera copes well with quite high ISO setting.  The following exercise asked us to shoot scenes at high and low ISO settings to compare the pros and cons.

 20sec f14 ISO200
 This image of a Miami Beach hotel is taken on a tripod using an insensitive ISO of 200 with a good f stop for depth of field and an appropriate time to expose properly.  The long exposure produces the smooth water on the fountain and the light streak of a passing car.  The depth of field is great and it makes a good image.

Closeup
  The 100% closeup doesn't show any noise and it is a nice clean image that could be enlarged to poster size without any concerns except for a number of artefacts that would need to be removed before printing.  These artefacts, seen below, show up as bright specks of white or coloured light are a result of the long exposure required for the shot.  With low light some pixels on the sensor prove to be inappropriately sensitive and display themselves as bright spots, they are often referred to as 'hot pixels'.  Their output is interpreted as real light and the camera's sensor logic highlights the area.  The appearance of these artefacts can be reduced by using the camera's long exposure or low noise settings or they can be manually removed post production.

 Closeup

1/25 f4 ISO6400
Shot again off the tripod, the hotel looks very similar, particularly when displayed at this size and only at 72 DPI.  The shutter speed is much faster having gone from 20 seconds to 1/25th of a second which has given a different effect to the water fountain, partly freezing the water.  The depth of field is much smaller but since most of the image is approaching infinity it all looks well focussed.  It isn't until we examine the close up that the differences can really be seen.
Closeup
Now we can see that the smooth and even colours of the image look mottled with noise and false artefacts when the sensor is set to such a high ISO.  This is the trade off between exposing for a long time with a low ISO setting and exposing for a short time with a high ISO setting.  It is the equivalent of using fast film which employs large silver halide salts to absorb the light quickly enough but has a large and visible grain when enlarged.   In a digital camera the noise comes from the amplification of the sensor signal (Gaussian noise) needed to increase its sensitivity to allow for the low light levels. The problem with noise on digital images is that the natural and uneven look to a grainy print is replaced by an much more regular and multicoloured effect.  We have grown used, over the years, to accept a grainy black and white image as a natural, indeed full of atmosphere and emotion which can enhance an image.  Noise on a digital image just looks like an electronic failure and detracts from the images purity and quality.  

  25sec f13 ISO200
Taken across a busy street, the exposure duration has much more impact on this image as  25 seconds with the shutter open gives rise to ghost images and streaks of light that add to the feelings of activity and light in the composition.  Some cars appear less blurred than others as they were waiting at traffic lights and moved late on in the exposure.

Closeup
The lack of noise at ISO200 is apparent here in the closeup and if people remain still enough they appear as normal as opposed to a blurred ghost.
 1/30 f4 ISO6400
 The advantages of shooting at a high ISO and therefore a faster speed is that the motion blur becomes manageable and the cars are frozen allowing us to include a limo into the image which would otherwise have been just a streak of light.
  Closeup
The drawback is, as I have previously mentioned, the level of noise that builds up at high ISO settings.
15sec f14 ISO200
Again here a long exposure has allowed good depth of field but given a strange look to the sitting man's feet as he moved them during the exposure.
 Closeup
No noise or artefacts which makes this an excellent choice of exposure for an enlargement.

 1/50 f5 ISO6400
At ISO6400 the sensitivity allows the speed to rise to 1/50th which gave me the chance to freeze the movement of some passers by, something impossible when the exposure is measured in seconds.
 Closeup
The level of coloured noise that occurs at a high ISO setting is very apparent against the white of the church front.

1/60 f5 ISO6400
Although noise is ugly and rarely acceptable in a colour image, when the image is converted to black and white the noise resembles our old friend film grain which we love.  This gives an acceptable alternative to a high ISO blow up that might otherwise be unusable.


Although in this case I rather miss the blue palm tree!