5 Feb 2011

Exercise: Measuring Exposure part 2

The second part of this exercise asked us to photograph a number of subjects shooting each 5 times from -1 stop, through EV0 to +1 stop at half stop intervals in order to see which exposure level looked best and which gave unexpected but good results.  My choice for the best exposure level is the larger example.

 -1
-1/2
EV0
+1/2
+1
The doves are one of the few subjects that I shot which more or less work at all exposures from -1 to +1 stops.  The -1/2 stop to EV0 work best as the background colour is nicely saturated and the details of the doves are at their best but they are acceptable even when slightly overexposed.

-1
 
 -1/2
EV0
+1/2
+1
Like the doves, the drum kit also managed to look quite good all the way from -1 to +1 stop of EV range.  I believe it is because that neither composition has any large extremes of light value.  As we can see from the histograms below, both images show a fairly constant light level that can accommodate a small movement in exposure without becoming disastrously under or over exposed. We will see later on that when there are extremes of light values then a movement from the ideal exposure results in very poor results.

Dove histogram EV0

Drum histogram EV0

 
-1
-1/2
EV0
 +1/2
+1

This gloomy drizzling day on the moor walking the dogs was a day where the camera was having difficulty in coping with the low levels of reflected light which meant that the cloud was just about the only source of relative brightness.  As a consequence, everything below +1 stop was underexposed.

-1

-1/2
 EV0
 +1/2
 +1
The Japanese snow lantern here is in an area of fairly constant tonal values so with no particular highlights or deep shadows EV0 is a very good exposure value.  Because I prefer the greens to look a little more saturated I prefer the -1/2 stop value but there is little to tell between the exposures until we get to +1 stop which looks decidedly washed out.
 
 -1
 -1/2
 EV0
+1/2
+1
The white barked tree here is shot against a pale sky just after sunrise but despite the low light levels the sky still completely dominates the tree and it can only really be seen properly at +1 stop.  Any lower EV than this starts to turn the tree into a silhouette which, given the attractive detail, wouldn't be good.  The histogram for this shot at EV0 shows the large hump representing the sky and the smaller hump which is the tree.  Any lower EV and the graph moves left until the tree is completely black.  Even at EV0 the tree is a long way left on the graph and to be exposed properly it needs to be moved closer to the centre by increasing the exposure value.

 Tree histogram


 -1
 -1/2
 EV0
 +1/2
 +1
Despite being a similar composition to the tree above, this clock tower occupies a larger area of the sensor so that the camera has tried to expose it as the main subject despite the brighter sky around it.  The nature of the clock face, however, benefits from slight under exposure to highlight the rusty streaks that line it and to give it a more dingy feel.  So a -1 stop exposure suits it much better than the +1 stop exposure that I chose for the earlier tree.  Out of interest the histogram for the clock looks like this:

 Clock histogram EV0

 Clock histogram -1


31 Jan 2011

Exercise: Measuring Exposure part 1

The first exercise for the Light module asks us to examine a handful of photographs that we have taken using a higher or lower light setting than the camera estimated and explain why.

1/640, f11, ISO400
Here is a shot of the Golden Gate bridge that was taken with a significant amount of sky in the image and although it wasn't a particularly bright day the camera metered for the sky leaving the rest of the image looking rather gloomy.


1/400, f9, ISO400
By adjusting the exposure by +1 stop the image is exposed to show the details of the landscape.

 1/20, f4.5, ISO400
For this shot into a shop window, the camera has tried to lift the overall light levels of the artificially lit interior which has resulted in an over exposure and at 1/20 sec enough camera shake to prevent a decent enlargement.

1/80, f4.5, ISO400
 By stopping down by -1 stop a more representative light level  and a more dramatic result was achieved.  The mannequins can be seen in better detail, the colours of the dresses are more saturated and the image is appreciably sharper. 


1/800, f14, ISO400
The pig artwork is poorly exposed as the camera has tended to meter for the pale building and sky in the background.

 1/400, f10, ISO400
 Having increased the light settings the details and impact of the subject have been recovered as the colours are much more dominant.

 1/80, f5.6, ISO400
Here the light coming through the bright coloured window has dominated the exposure and the chairs in the foreground are lost.

  1/50, f5, ISO400
By increasing the exposure compensation by +2/3 of a stop the foreground is now properly exposed whilst the background still retains its light and colourful quality.


 1/100, f7, ISO400
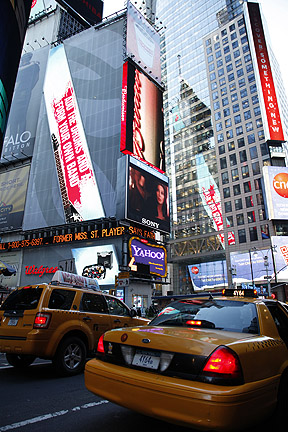
In this image of Time Square, the brightness of the sky reflecting from the buildings has made the foreground rather gloomy.


 1/80, f5.6, ISO400
 In order to recover the colours and detail in the foreground the shot was taken again with +2/3 stop which has lifted the image nicely and balanced the light from street level and from the higher parts of the image.

Although modern cameras have very sophisticated metering capabilities, they have no real idea what it is that you are photographing and can only attempt to balance the levels of light and dark to achieve an average result.   When the camera is fooled it is up to the photographer to compensate to achieve the desired result.  Nowadays we have the enormous advantage of being able to review a photograph and its histogram immediately to ensure correct exposure.  With wet film the only option was to bracket the expected exposure settings to ensure that good result.  That bracketing option is still available on good digital cameras and is a smart thing to use for those important photographs when lighting is difficult and the option to examine and retake the shot is not there.
  

28 Jan 2011

Assignment 3 - Tutor Feedback

My Tutor has been busy so it has taken a little longer than usual for him to get back to me.  The wait was worthwhile as he was most complementary about the majority of my work which is available here.

Without going into too much detail he was pleased that I had managed to produce a number of striking images.  The ones he highlighted as being my weakest were:

Yelow Peril, where he felt that the photograph didn't explain itself well enough.  He thought that I might have tried to take more control of the shot to get a better image.  The trouble with street photography is that the only control that is usually available is a quick movement to change angle a trifle, a zoom to frame the shot, a setting adjustment and the moment when to press the shutter release.  I don't often try to pose my street subjects unless they initiate a dialogue and make it obvious that they are amenable to being positioned.  For me the expression of the spiky haired girl was a moment captured and probably not repeatable.

Bad Hair Day, could have been better framed around the second girl with the blue hair.  In this, my tutor has hit the nail on the head as I have re-looked at the photograph and realised that the gap between the two girls was too big and/or I should have given her a bit more room to the right of the image.

Floating High, suffered from slightly bland colours and the composition wasn't as strong as the others.  I also felt that this was my weakest image also because of the lack of colour both in strength and area.

Where's my Super Mum, was a good image but we both felt that it suffered from having a subject that was a little too large for the frame to be a strong colour accent.  I had my 100-400 mm lens on and was working the crowd from above so was zooming in tight onto my subjects.  When I took the shot I didn't really have a colour aspect image in mind which is a shame as I could have easily backed off a little to get the desired effect.

The shots that were singled out for praise were:

Travelling in Style, which was considered a striking image but it was suggested that I might have cropped out the top of the bus to create a more surreal image,  I don't actually agree with this as I think it would have just looked like a taxi going past an advertising board and the inclusion of the people at the top of the image gave an extra dimension.

Petal Pushers, an orgy of colour.

The 3rd Encounter, where the colours worked particularly well against the jet-black background.

Orange Box, where the composition was complemented.

Gardening Shoes, was considered vivid and an excellent observation.

You Looking at Me, was thought to be a great image with 3 simple elements coming together well.

The Colour of Coffee, showed elegance, good geometry with great balance.

Life Preserver, was thought to be the best of the bunch providing an incongruous juxtaposition.

I'm chuffed that this assignment was so well received particularly as I found it so hard to discover the colours that were needed in real life situations.  I probably worked through three months of work to get the images I chose and was pleased that my efforts weren't wasted.

Other areas of comment included my blog which showed plenty of good work, particularly as I had managed to get to the Henri C-B and Capa exhibitions.  

Finally it was suggested that I should keep my assignment captions simple, just place and subject rather than trying to enforce the narrative.  I guess they would also appear more professional that way... point taken.

24 Jan 2011

Into the Light

My Tutor advises me that it will take him a while to get to my Assignment so in the mean time I am starting to read Part 4 - Light.  In preparation I am studying from a few of my favourite photo books looking for information and background on this huge subject. I don't expect to get much from Tom Ang's Digital Photographer's Handbook as he only touches on each subject in a wide field covered by the book.  John Hedgecoe covers a bit more in his very detailed book The Photographer's Handbook and I do like the amount that John covers, leaving very few stones unturned.  However, I expect to get the most inspiration from Light, Science and Magic by Fil Hunter, Steven Bever and Paul Fuqua.


Of course our OCA study notes will by the backbone of my study materiel as it leads me into the first Exercise, Measuring Exposure.  To make sure that I fully understand how my camera measures light I have been studying my manual again.  My Canon EOS 5D and 5D II have the same metering systems which allow four types of light measuring.


The most sophisticated is the Evaluative metering mode which is an all round metering mode suitable for portraits and even back lit subjects.  This is a type of matrix metering which weighs the intensity of the light from all round the subject and using complicated algorithms, comes up with a light setting that limits the amount of blown and dark areas whilst concentrating on the subject which is assumed to be under the focus point used.  In almost all but the most difficult lighting conditions, this setting works very well.


The camera has 3 other types of metering.  Partial metering which covers about 8% around the centre of the viewfinder area; Spot metering which covers only 3.5% of the viewfinder area and Centre-weighted average metering which is weighted at the centre of the viewfinder but averaged for the entire scene.


Other metering controls allow a quick selection of exposure compensation by stopping up or down from the metered value by up to 2 stops.  In addition an automatic Exposure Bracketing setting is available for up to 2 stops either side of the metered value.  Finally, an exposure lock feature allows the metered value to be frozen and used when a subject is re-framed to a brighter or darker value.


Once a photograph has been taken, the monitor can produce a histogram of the light distribution in the image and illustrate blown highlights on the image thumbnail by marking the areas with a flashing outline. The camera uses between 10% & 18% of reflected light as its base exposure level.  Any object that reflects more than this will fool the camera into underexposure and visa versa.  This is why the photograph of a piece of white paper will often look grey.

18 Jan 2011

Assignment 3 - Colour

I have published my TAOP Assignment 3 - Colour on my assignment web site and it is available for viewing here.  I have enjoyed getting back to serious work and although this module had offered its fair share of frustrations I did enjoy shooting the assignment and going through my selections for assessment.

Any comments would be much appreciated.

17 Jan 2011

Christmas presents

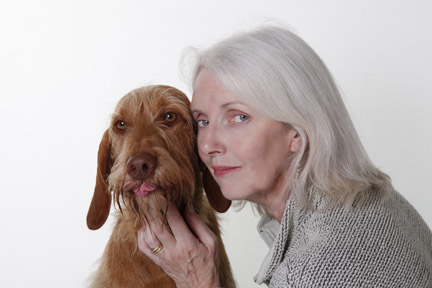
Father Christmas was good to me this year!  I have been hankering after some compact studio gear to enable me to quickly set up a portrait session and get quality, repeatable results every time.  I saw the work that a college did on photographing the kids at his school and was very impressed so begged Santa for the Lastolite Hi key background and some more studio lights to use with it.


I am delighted with the background and have been playing with it making my long suffering family pose.  It unpacks quickly, is self standing and takes one or two flash lamps in the sides to illuminate the interior.  Once this is done, any normal studio set-up can be done around the model without the need for any back lighting as that will come from the background.  The balance of light is to get the exposure coming from the background 1-2 stops higher than the light you are putting onto the subjects.  Once this is done a completely shadow free shot can be taken regardless of how close to the background your model stands!  This has great advantages when working in limited space since the whole thing is only 6"x7" and a couple of feet deep.

I have still to experiment and perfect my set up but here are a few shots from my first attempt with it.


I am getting some falloff in these shots as I tried putting only one lamp into the background and the illumination isn't quite even enough but with one each side that problem should go.  All in all I am very pleased with the results.  The only real problem is working out how to twist the background back into a circle to get it back into the carrying case!

22 Nov 2010

The Mexican Suitcase!


In 2007 a suitcase which had been lost since 1939 was found.  Not in Heathrow's Terminal 5 and not full of dirty washing but in Mexico City and containing the lost negatives of Robert Capa's photographs of the Spanish Civil War.  The suitcase had been passed from hand to hand for safe keeping but eventually its location became unknown until by chance the negatives were found and recognised for what they were.  Not only Capa's work but also those of fellow photojournalists David Seymoure, Fred Stein and Gerda Taro were in the collection.  There were nearly 4,500 negatives.


I was lucky enough to get a chance to view this unusual collection at the New York International Centre of Photography where there was an exhibition of the negatives and of some of the prints that have been made from them.  The war broke out in 1936 and was a military coup led by General Franco and instigated to overthrow the democratic government.  The suitcase contained an extraordinary window into the vast output of the three photographers during the war.  Portraits, battle sequences and the harrowing effects of the war on civilians were on display.  The material not only provided a fascinating view of the war but also demonstrated how the work of these key photographers laid the foundation for modern war photography.


It was sad to note that Gerda Taro was killed in battle in July 1937.

1 Nov 2010

Henri Cartier-Bresson at the SFMOMA


Although I was forced to put my work to the side for a few months I have continued to pursue my interests both with my camera and my eye. Whilst in San Francisco a poster caught my attention and I took time out to visit the San Francisco Museum Of Modern Art (SFMOMA) to look at some work by Henri Cartier-Bresson.


Cartier-Bresson (C-B) has long been considered one of the original street photographers and the father of the modern reportage style of photography that has influenced so many photographers.  As a lover of street photography I view his work with reverence so was delighted to get the chance to see some of it in the flesh.  


The exhibit was well attended despite being the middle of the week and I was delighted to be able to use my camera and sound recorder to make notes as I went around.   The work being displayed ran from some of his early work right through to the photo journalistic work that he did later in life.  I have singled out some of the prints that I saw for attention as they particularly appealed to me.

Valencia - Spain 1933

Taken in 1933 this image is of a couple of uniformed workers by a garage.  He has, in a moment, seen an opportunity to capture the head of one worker looking through a square cut in the door whilst his colleague comes through the doors looking away.  Our attention is taken by the disembodied head which looks even more strange with one eye glass opaque and yet our interest is further piqued by the open door and the other worker coming out, his attention directed into the darkness allowing us to wonder what is inside.

Not all of his work shows such spontaneity and I found a few images to be quite obviously posed with the peoples attention directed at the camera whilst they vie for attention.  These may have been images that he took for his work but they don't have the same attention grabbing quality for my taste.  One such image can be found here.

C-B was present at some momentous occasions throughout history including the funeral of Mahatma Gandhi and he took some remarkable shots of the event and the anguish shown by those present.

Brie - France 1968

This photograph taken in Brie is a wonderful landscape that in many respects follows the rules beautifully.  The road and trees are on the left 1/3 and the horizon is on the bottom 1/3 but then he does something unexpected that, for me, makes the photograph... he leads the road out of the frame to the left!  I would have placed the road to the right and led the observer into the scene and it would have been a  beautiful but conventional view.  Had I done what C-B did I have no doubt that an assessor might have looked at it askance and wondered if I knew what I was doing!  In the case of C-B he is obviously well aware of the imbalance and the way it adds a little tension and wonder as we are naturally curious as to where that road goes but not provided with an answer by the photographer.  We have to use our own imagination.

Juvisy - France 1938
 
Although I believe that this is probably a posed shot, the family take no interest in the photographer and are all caught in mid-action, it doesn't detract from the composition.  There is no eye contact with the camera and the position of the grouping takes us from the large gentleman in the foreground pouring his wine down the bank observing each person in turn and eventually out to the punt, moored with the fishing rods lazily dipping into the river.  I love the way that no-one is making eye contact so we are put in the place of a discrete observer of this family scene.  It is 'everyday' but the composition makes it much more than that and from a modern aspect gives us a beautiful and sentimental view of life for these people.

Paris 1953

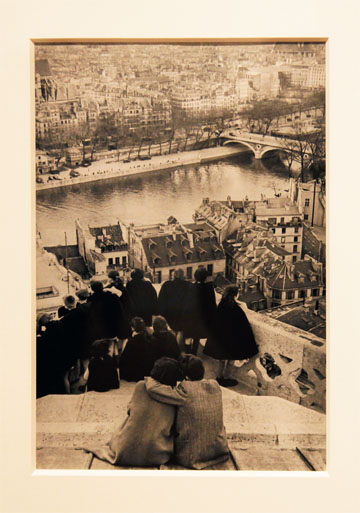
This view of the Seine in Paris taken from a high vantage point overlooking the city is a great example of C-B's eye for the moment.  A great view of the city but made so much more by the interest we find amongst the people in the foreground.  He was so much the master of catching moments like this that it is hardly surprising I delight so much in his work.  From the courting couple in the foreground to the horseshoe of school girls in their black capes around the balustrade, all is designed to give the image great interest, a wonderful depth and to take our eyes out from the foreground into the distance.  Anyone who has ever shot a city scape needs to see this image as a lesson in how to turn a straight forward photograph into something much more special.

New York 1947

I have to be honest and admit that I don't really associate C-B with America but he first went there in 1935 to exhibit work and did some shoots for Harper's Bazaar.  He shot a documentary about war refugees for the American Office of War and about the time of this photograph he helped found Magnum Photos with other renown photographers Robert Capa, David Seymour and George Rodger.  The photograph here that he took of a New York free-way has a surprisingly modern feel to it albeit with a tiny fraction of the cars we would now see.  For me the image is a sinuous series of lines that complement each other as they copy the line of the river bank leading up to the horizon.  He has made a conventional and contemporary (of the time) view into a very pleasing image that reflects many of the attributes we learned in our Elements of Design module.

Miami 1957

C-B had the perfect knack of summing up a place in one simple view.  This is a classic example and there is really no need for the caption as anyone who has been to Miami will recognise that the essence of the place has been truly captured.  Bright white buildings lining the ocean in stark and unforgiving sunlight.  An older man slavered in oil with skin as dark a mahogany is massaged by a pool.  A picture truly paints a thousand words.  Not only is this a thoughtfully composed shot from the point of its content, note how the walls enclosing the sunbather follow the 1/3 lines and help to direct the eye up into the shot following the left wall up into the line of the street beyond. 

Henri Matisse - France 1944

C-B was also a master of portrait photography and during his life shot many famous personalities, Truman Capote, William Faulkner, Coco Chanel, Jean Paul Sartre, etc.  The image here of his friend Henri Matisse is shot only 10 years before Matisse dies.  He is suffering from an illness, recently divorced and consigned to a wheelchair.  The painter and sculptor who was nicknamed 'Wild Beast' is captured low and small in the frame wearing a turban, and surrounded by birds.  A shadow of his former self and looking a broken man, C-B has captured the essence of a man in the decline.  What is not obvious from my reproduction above is how C-B has used depth of field to bring Matisse to prominence in the photograph, despite giving him a subordinate position when compared to the open cage of doves in the foreground.

Nara - Japan 1965

This is a photograph that reflects some of my own efforts to find patterns and interest in unlikely places.  Shot in Japan near the old capital city of Nara, this is a simple image of swirling water in a ditch, probably at the side of a padi field. I find it delightful that C-B saw the opportunity for a meaningful image in something that many would walk by without a second glance.

 
 BBC 1967

 As comfortable in an interior setting as outside, C-B never used flash photography.  He was also renown for composing his photographs completely in the view finder and never allowing cropping or recomposing when printing to the point of often showing the edges of the negatives when making prints.  Despite this he was quite capable of moving with the times and taking shots of, what was then considered, state of the art technology.
 
 Berlin Wall 1962
This moment of observation is a classic C-B moment.  Without knowing any better, I do wonder how he was able to be in the right place at the right time so often in his life.  The balance of this image with the one legged veteran of the war, the guard, the lamp post and the guard hut all working together to create the narrative of the photograph seem an impossible fluke of street photography.  Yet for C-B these moments seemed to follow him around.  No wonder he called his classic book of photographs 'The Decisive Moment'.

"In photography, the smallest thing can be a great subject"
Henri Cartier-Bresson